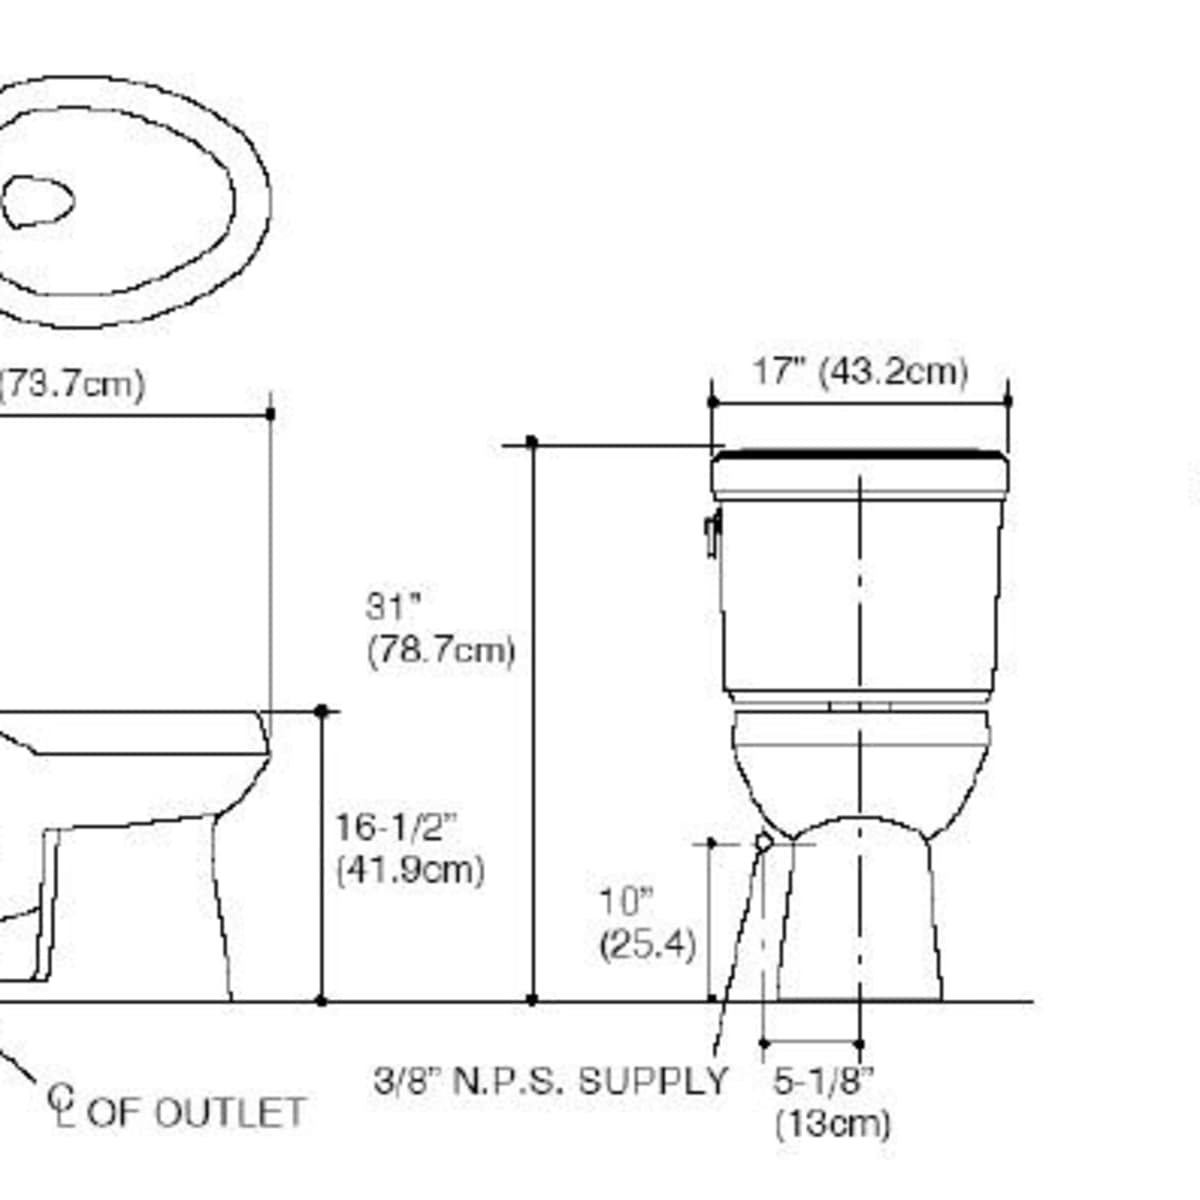
38 install toilet tank bolts diagram
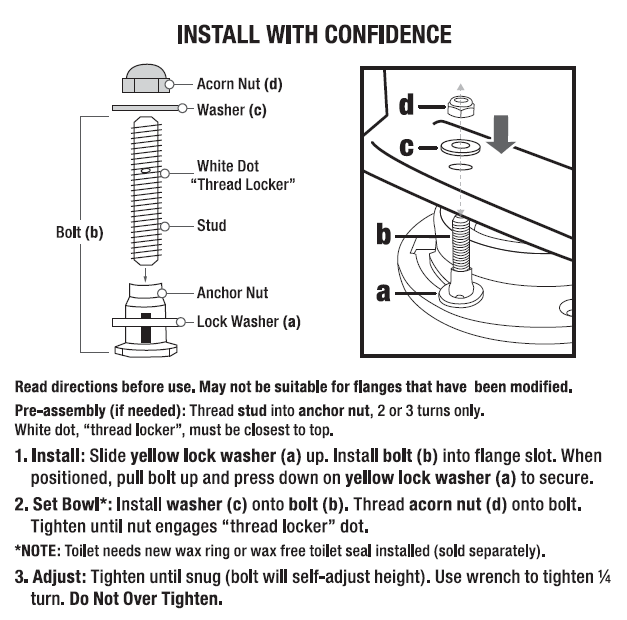
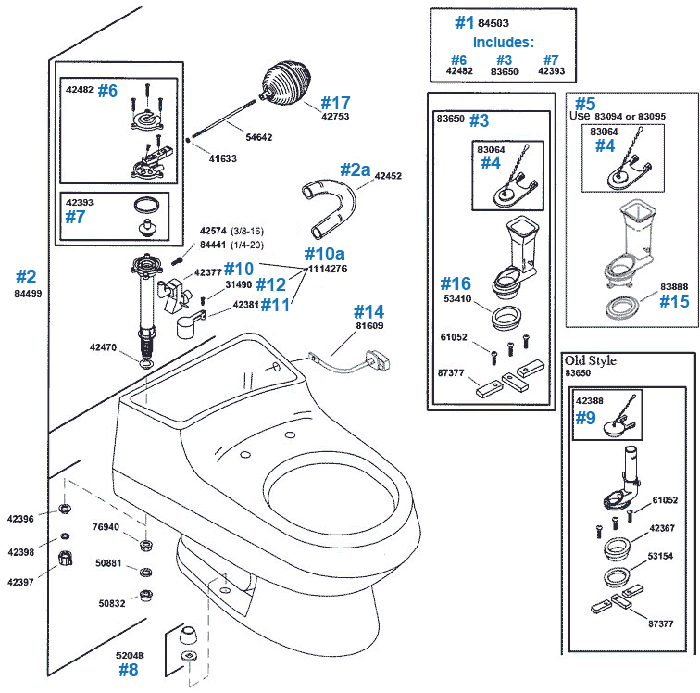
Mansfield® Plumbing Products demonstrates how to correctly install a tank via a 2-bolt SmartFasten™ system to ensure a sturdy connection between tank and bow... Step 1 - Obtain Supplies for Replacing Toilet Tank Bolts. Go to the nearest plumbing supply store or home improvement center in your community in order to purchase the supplies needed to replace the toilet tank bolts. This includes the Johnny bolts, toilet floor flange, toilet wax bowl ring and any tools that you do not have that are listed above.
Wax ring seal or plumbers putty – Large screws or toggle bolts 1. Shut off water supply, disconnect plumbing and remove existing toilet bowl. 2. Install #413-HA tank handle assembly with chain to tank. Remove handle screw with Phillips screwdriver and remove handle. Remove the front of the trim ring by turning clockwise (this is a left-hand ...

Install toilet tank bolts diagram
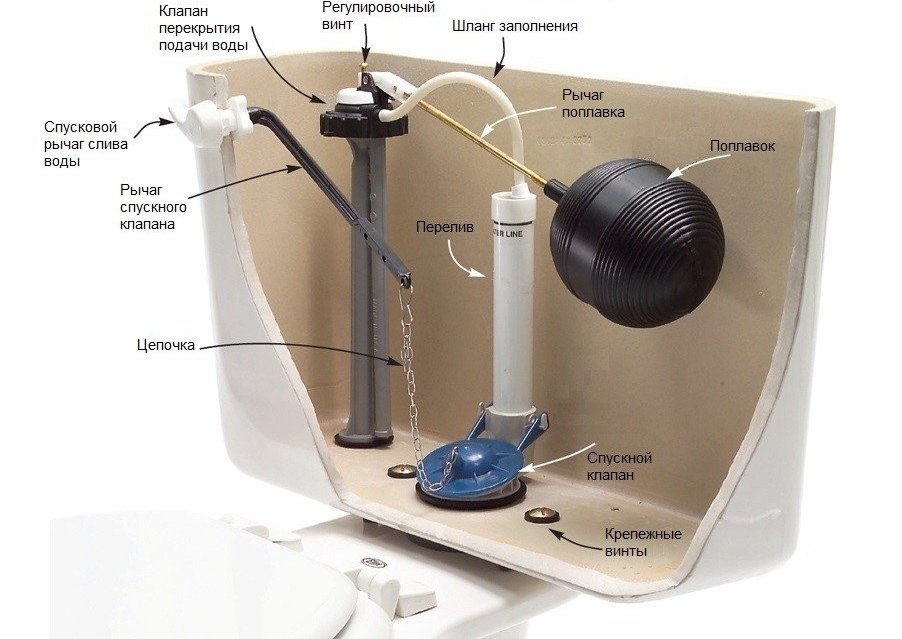
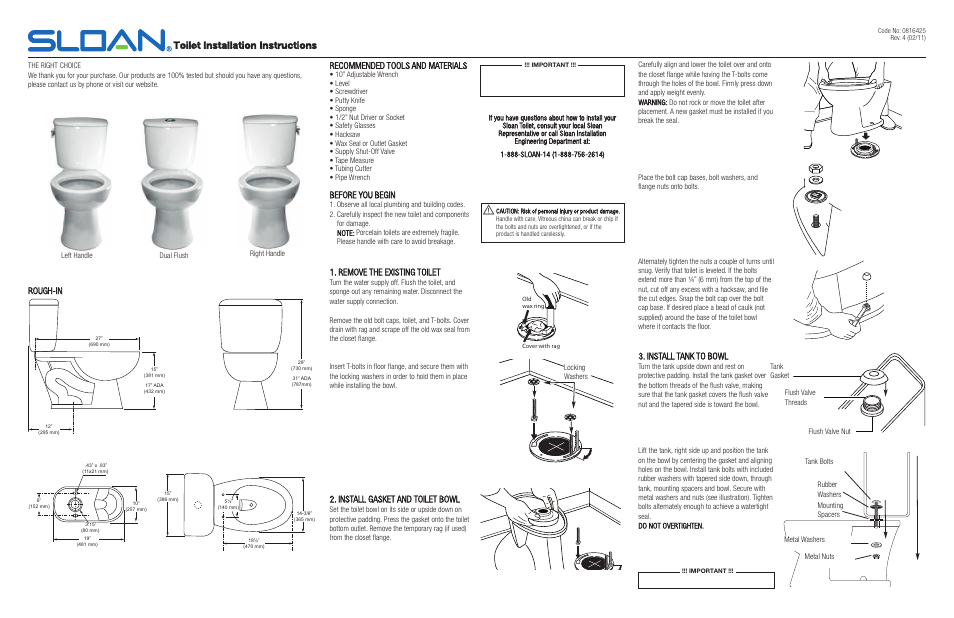
2) Disconnect the water supply line near the rear base of the toilet. 3) Remove the floor anchor Nuts that connect to the bolts at the base of the toilet. 4) Empty the water from the toilet bowl – as much as possible. 5) Lift the toilet straight up – and Remove the toilet – and set it aside. 6) Remove the old wax ring. Remove tank from bowl and replace bolts by placing bolts through tank with metal washer first followed by a rubber washer seating on inside of tank. Screw hex nut on bolt to bottom of tank. Replace tank-to-bowl gasket if needed (Sold seperately). Put tank in place on top of bowl. Place the other rubber washer on bolt followed by metal washer. Installing the tank bolts can be done in a variety of ways. Each professional has their own preference as to how this should be accomplished. Read more for Fluidmaster’s recommended installation and to see a diagram of the recommended installation. Recommended order of sealing and installing a tank to bowl toilet bolt: Bolt Head; Rubber Washer
Install toilet tank bolts diagram. 4:26Toilet bolt replacement. 186,334 views186K views ... Plumbing Advice : How to Replace the Tank-to-Bowl ...27 Jul 2013 · Uploaded by Michael Clark Add a new metal washer to secure the tank to the toilet bowl housing. Then, replace the washers and nut on the second bolt in the same order. Step 6 - Reattach the Tank and Refill. You and your helper can now raise the toilet tank back over the toilet bowl housing and reseat the bolts and central tank gasket correctly. 0:38Toilet Repair - Tank Mounting Bolts. Show less Show more. Next: NaN / NaN. How to install a 2" Flush ...19 Feb 2010 · Uploaded by HomeownerSeries 6:15Tank to Bowl Toilet Kit: http://amzn.to/2mj9irLThe dreaded slow drip from a toilet bolt... We will show you how ...3 Mar 2017 · Uploaded by House In Progress
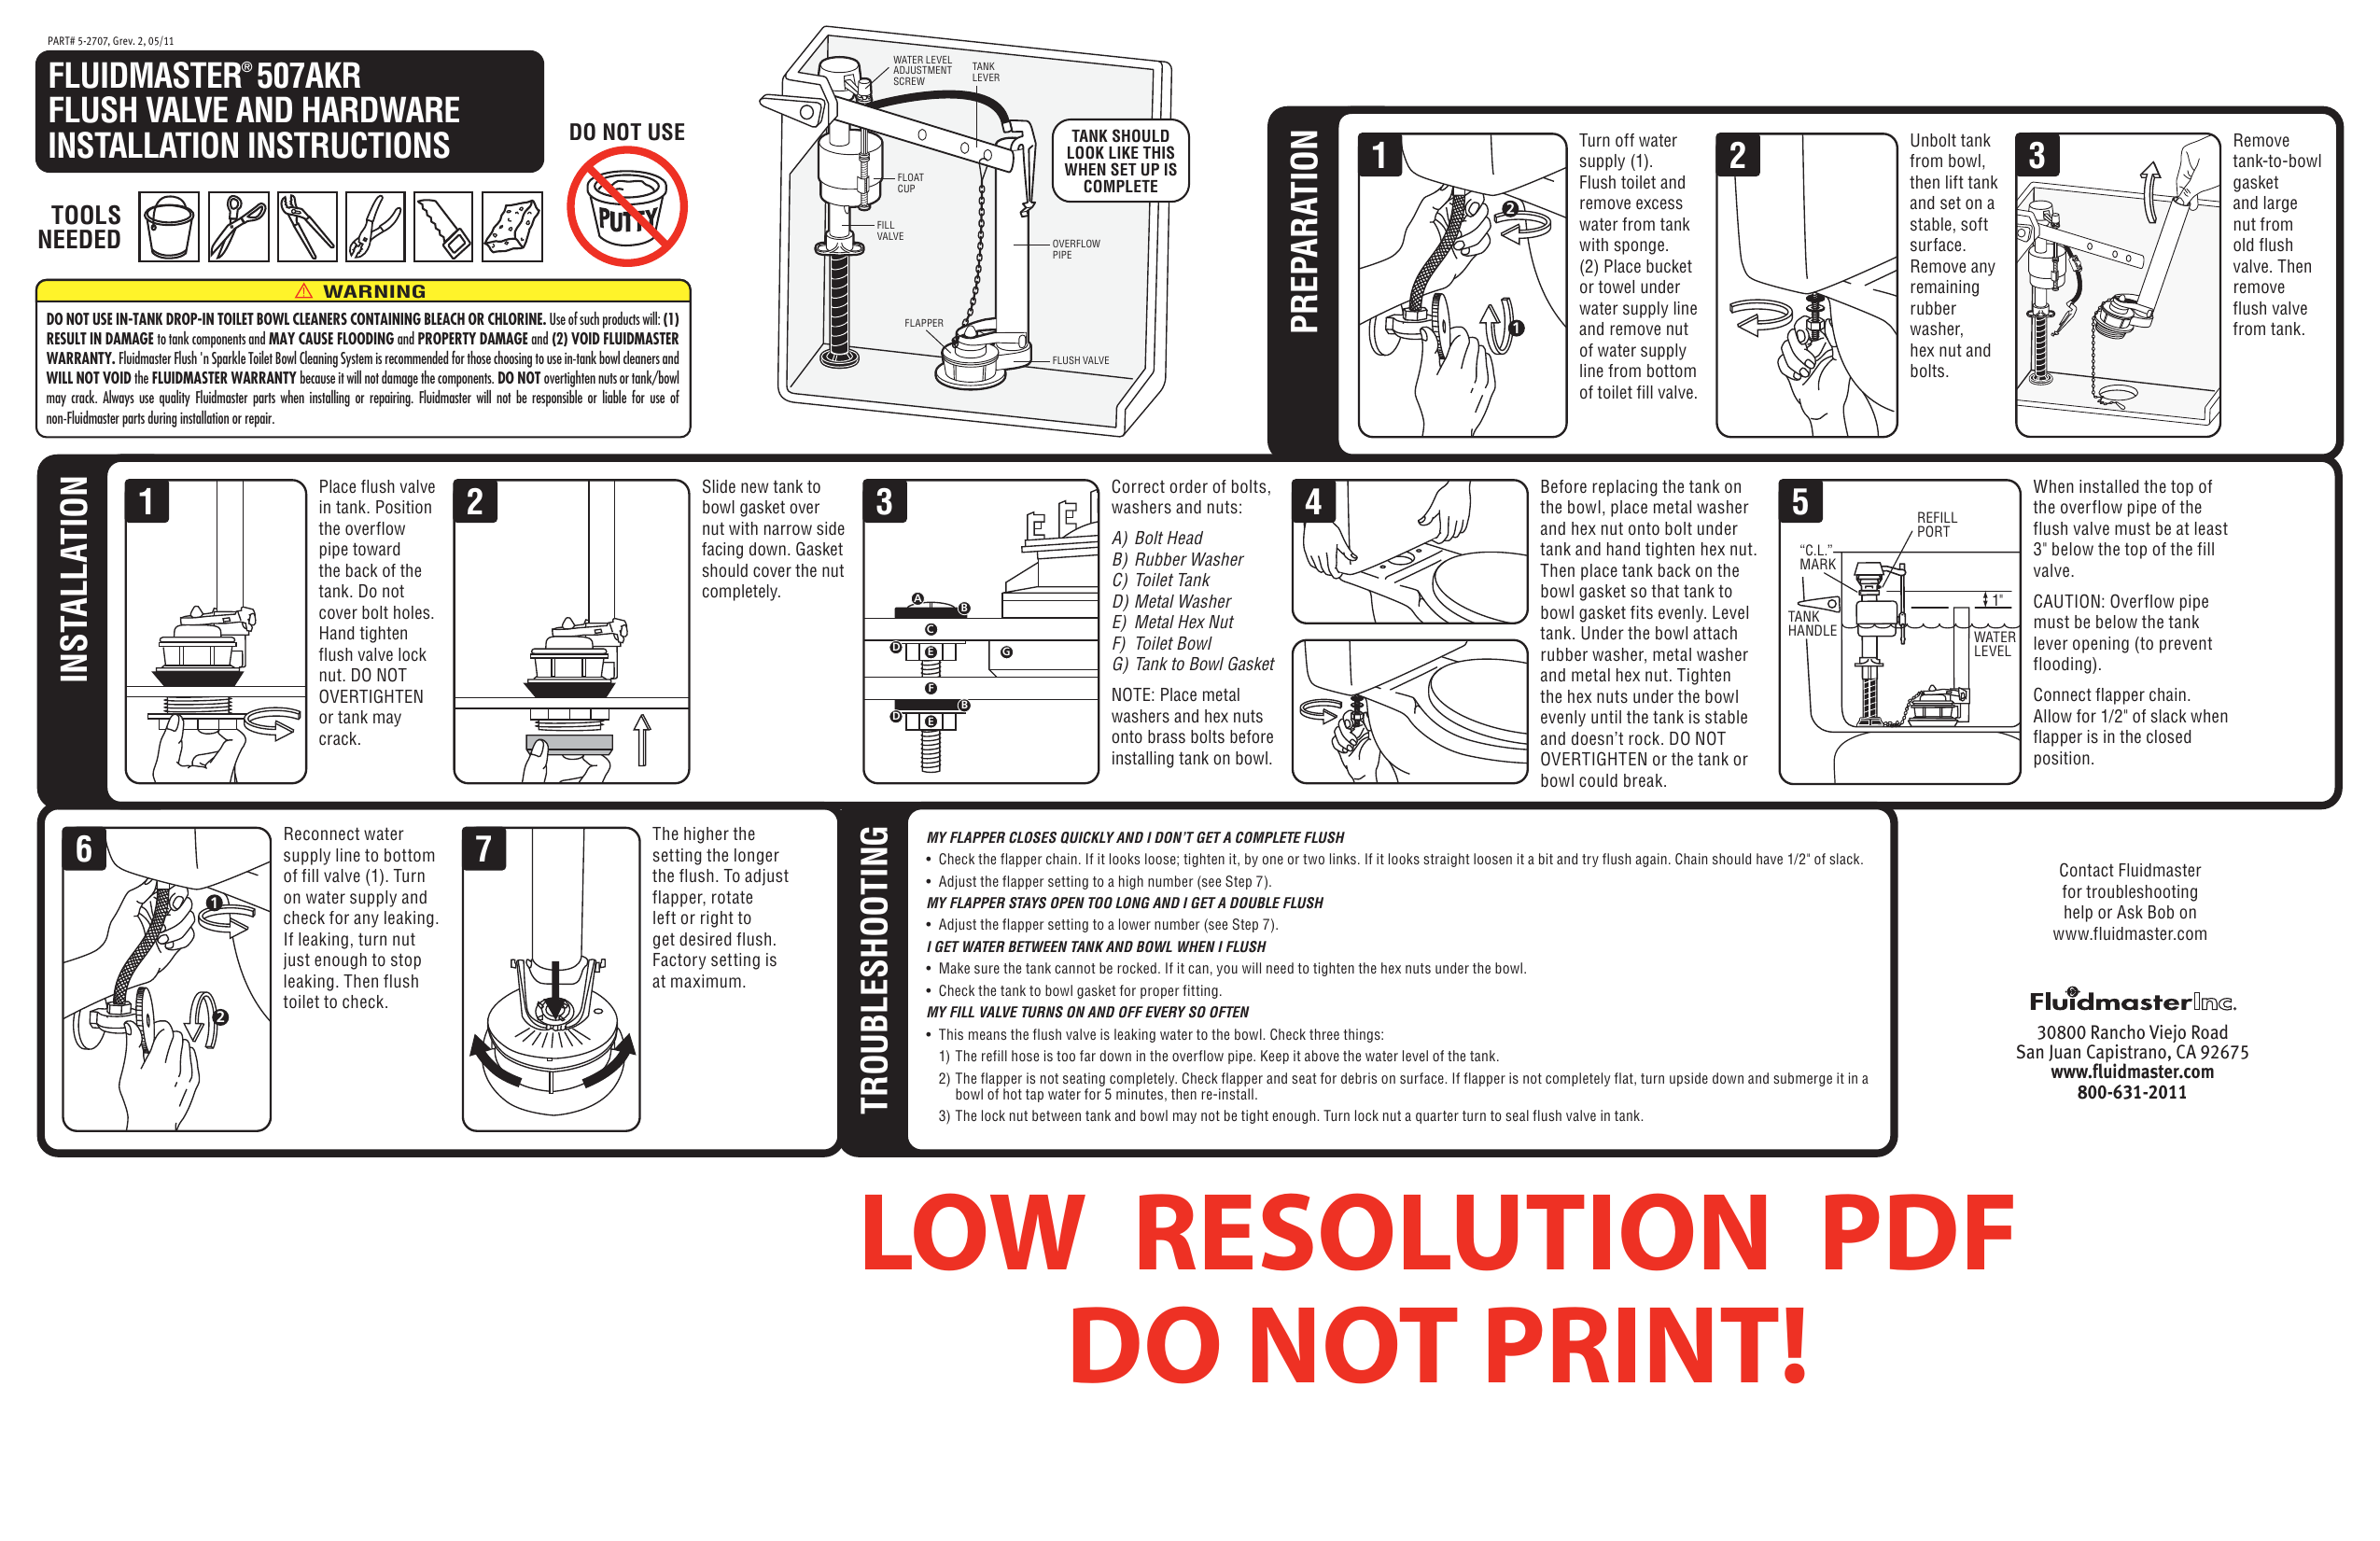
http://www.BobsPlumbingVideos.comThis video shows you how to replace or install a toilet tank to bowl. Professional plumber shows you how to fix that leakin... Leaking Toilet Tank Bolts. The time may one day come when you need to replace leaking toilet tank bolts; so, you should bookmark this article and keep it handy. The majority of toilets are made of two parts: the tank and the bowl. Together they store toilet water until flushing. Two bolts attach the tank to the bowl. Install the Tank Tank bolts come preassembled to the bottom of the tank. Remove the nuts and washers from the tank bolts and set aside. Position the tank on the bowl by centering the gasket on the bowl inlet. CAUTION: Risk of product damage. Overtightening may cause breakage or chipping of the vitreous china. Assemble the washers and nuts to ... 0:38http://www.homeownerseries.comFor Complete Toilet Replacement InstructionsPart 1 = http://youtu.be ...5 Jan 2011 · Uploaded by HomeownerSeries
1:34Locate and remove all old nuts, bolts, and washers from the toilet tank. Use the new bolts, rubber washers ...13 May 2016 · Uploaded by Korky Toilet Repair 4:31A toilet that is leaking from the bottom of the tank probably needs a new toilet to bowl gasket or toilet tank bolts ...8 Dec 2016 · Uploaded by Know How Now Installing the tank bolts can be done in a variety of ways. Each professional has their own preference as to how this should be accomplished. Read more for Fluidmaster’s recommended installation and to see a diagram of the recommended installation. Recommended order of sealing and installing a tank to bowl toilet bolt: Bolt Head; Rubber Washer Remove tank from bowl and replace bolts by placing bolts through tank with metal washer first followed by a rubber washer seating on inside of tank. Screw hex nut on bolt to bottom of tank. Replace tank-to-bowl gasket if needed (Sold seperately). Put tank in place on top of bowl. Place the other rubber washer on bolt followed by metal washer.
Amazon Com 2 Pack Toilet Tank To Bowl Bolt Kits Heavy Duty Bolts Toilet Bolts For Tank Solid Brass With Extra Long Nuts Easy To Install And Double Gaskets For Fastening
2) Disconnect the water supply line near the rear base of the toilet. 3) Remove the floor anchor Nuts that connect to the bolts at the base of the toilet. 4) Empty the water from the toilet bowl – as much as possible. 5) Lift the toilet straight up – and Remove the toilet – and set it aside. 6) Remove the old wax ring.

Oem Kohler Persuade Series Toilet Replacement Parts
What To Do If A Toilet Bowl Leaks How To Repair A Tank That Leaks
Toilet Repair Bolts Setfast Toilet Bolts Seal Toilet Bowl To Flange Fluidmaster

Problem With Screw Inside Toilet Leaking
Leaking Toilet Flapper Toilet Flapper Not Closing Toilet Keeps Running Fluidmaster
How To Install A Toilet Toilet Installation Procedures Details
Trade Secrets For A Professional Toilet Installation Dengarden
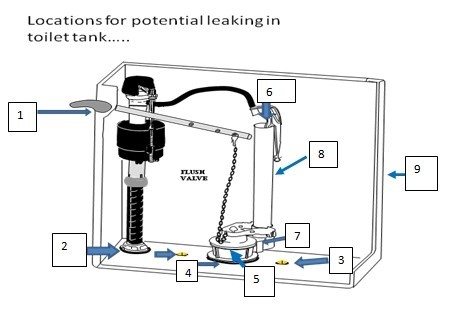
Toilet Leaking From Tank Bolts Here Is How To Fix It Toilet Haven
Kohler Rialto Toilet Repair Parts
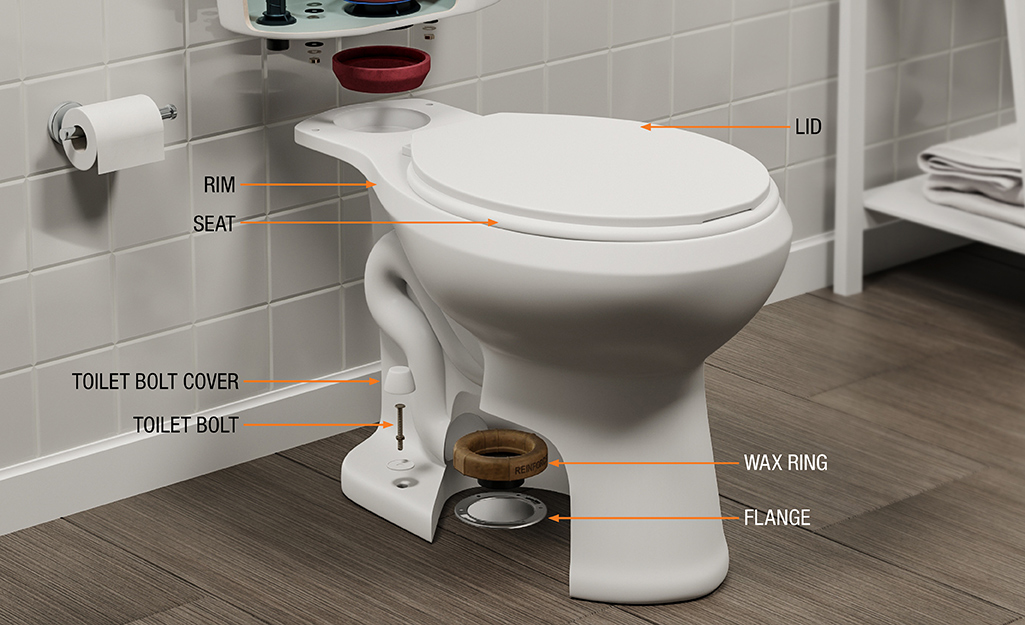
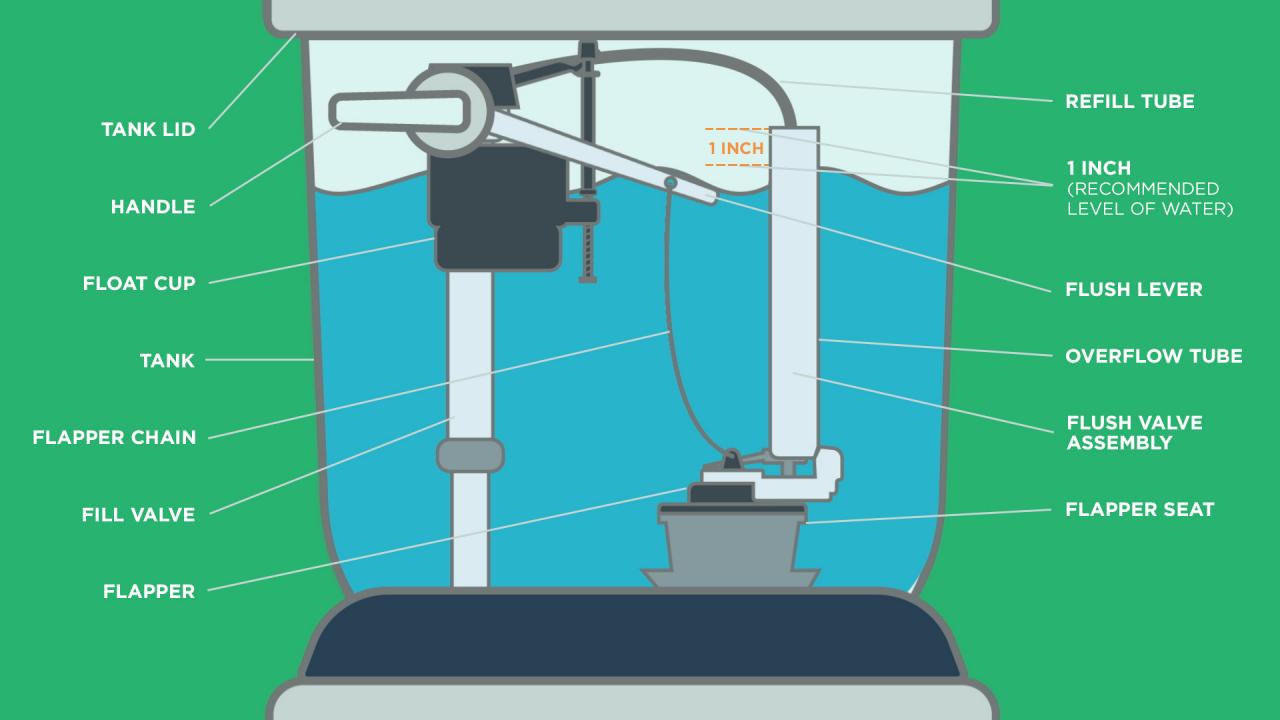
Parts Of A Toilet

Buy Fluidmaster 507akp7 Performax Universal High Performance 2 Inch Toilet Flush Valve Repair Kit With Gasket And Bolts Online In Indonesia B00h3kf6y0
Sloan Toilet Bowl Installation For Two Piece Toilet Tank User Manual 2 Pages
How To Install A Toilet Diy Guides Victorian Plumbing

Adjust The Water Level In Your Toilet Bowl It S So Easy

How To Fix A Toilet Leaking From The Tank Bolts Or Gasket

Home Plumbing Materials Home Garden Chrome Replacement Metal Handle With White Plastic Sleeve For Toilet Cistern Suneducationgroup Com
Easy 3 Step Fit Guide For Most Bidet Seats Many Bidets
Rusted

Stainless Steel Toilet Tank Bolts Set Of 3 2 Donut Gasket Water Saver Products
Trade Secrets For A Professional Toilet Installation Dengarden

Toilet Parts Plumbing Parts The Home Depot

Tank To Bowl Bolts Toilet Bowl Bolts Seat Hinge Unique Tank To Related Post Bolt Too Long Toilet Bowl Toilet Seat Hinges Wax Ring

Toilet Tank Parts Plumbing Diagram Pictures Repairs Toilet Haven

Toilet Tank Leaks At Right Bowl To Tank Bolt Doityourself Com Community Forums Toilet Tank Leaking Toilet New Toilet
Tips On Solving Common Toilet Problems Hgtv

1 4 X 3 1 2 Yzp Steel Toilet Anchor Bolt Are Sheng

Trade Secrets For A Professional Toilet Installation Dengarden
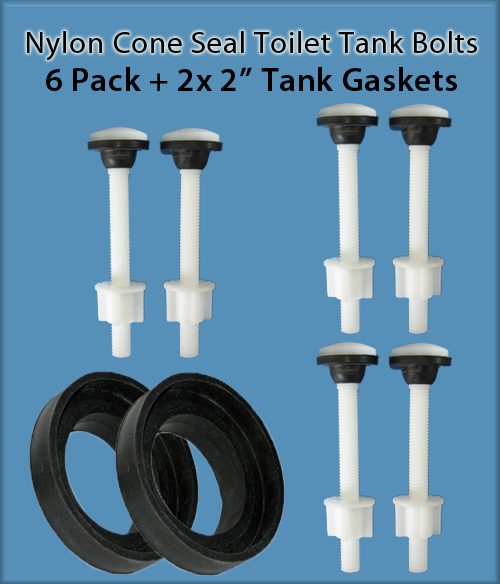
Nylon Toilet Tank Bolts Set Of 6 2x 2 Donut Gaskets Water Saver Products

Install Bifold Doors New Construction Install Toilet Tank Bolts Diagram

The Many Parts Of A Toilet 3 Diagrams Tank Toilet Plumbing Home Stratosphere
Toilet Cistern Dual Flush Push Button Valve 9 84 For Drain Diameter Bath Toilet Parts Attachments
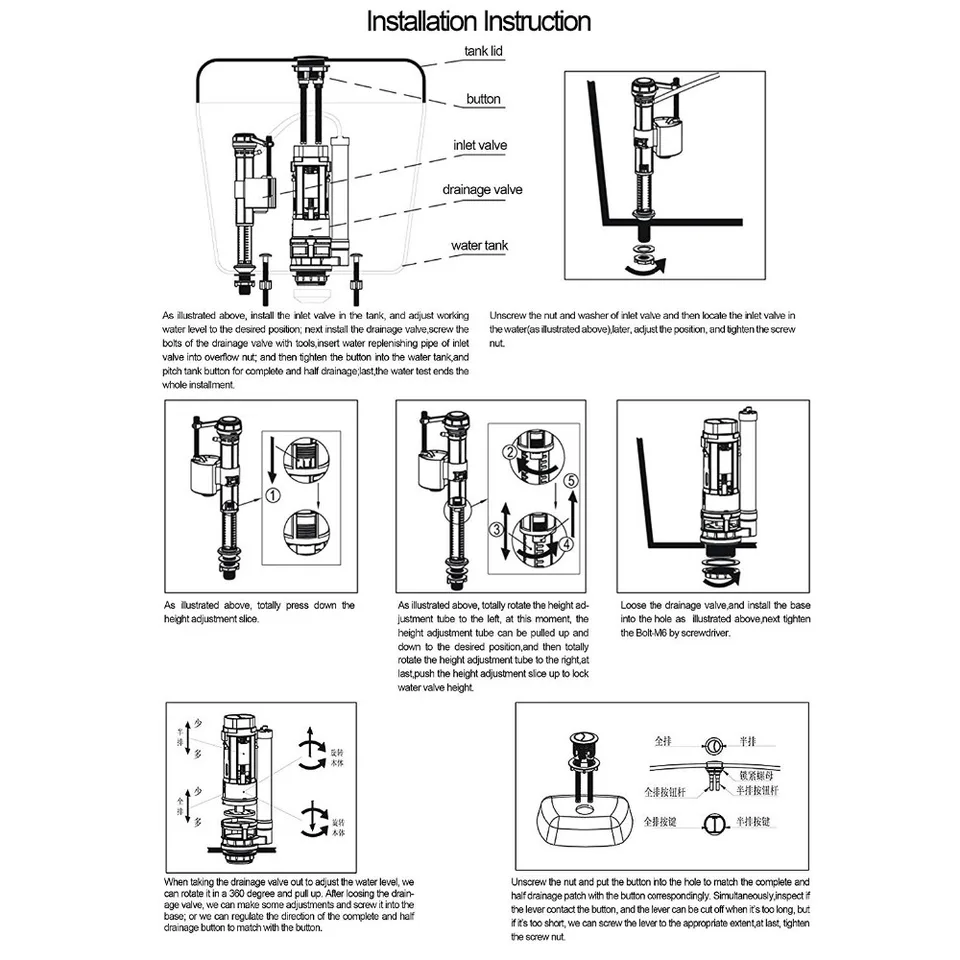
Installation Instructions Manualzz

Cesco Brass Toilet Fill Valves Parts And Accessories Troubleshooting Tips

How To Replace Toilet Handle A Step By Step Guide 1 Tom Plumber

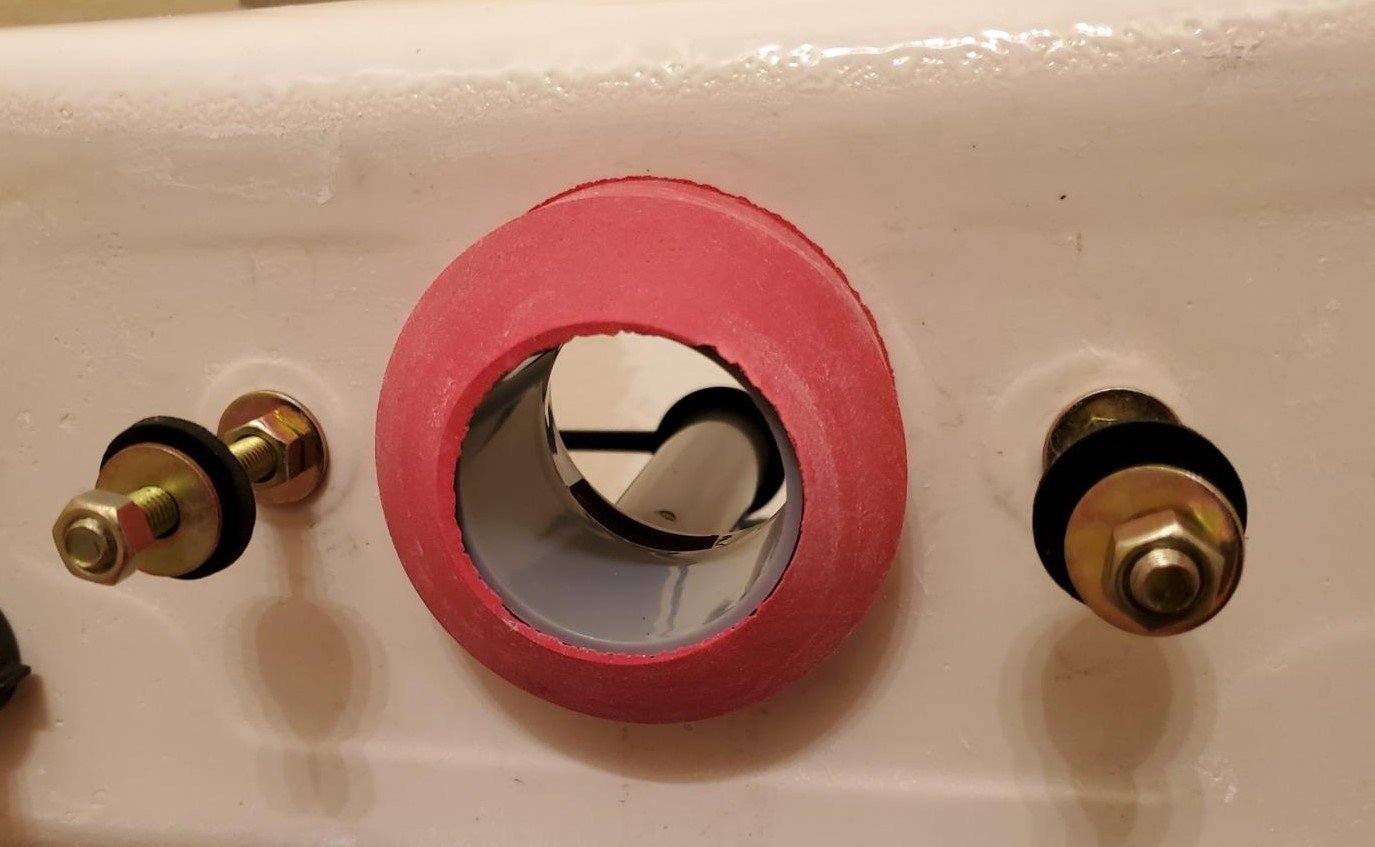
Help Toilet Tank Installation Screws Not Long Enough Diy

How To Fix A Toilet Parts Tank Mounting Bolts Youtube

2 Pieces Toilet Tank To Bowl Bolt Kit Heavy Duty Toilet Bolts For Toilet Tank Repair With Solid Brass Extra Long Nuts Buy 2 Pieces Toilet Tank To Bowl Bolt Kit
0 Response to "38 install toilet tank bolts diagram"
Post a Comment